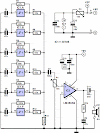
This battery level indicator offers (5) LEDs that light up progressively as the battery voltage increases. This is a update of the 24V Battery Level Indicator. While designed for 36V systems, it is easily modified to 24V, 48V or 60V simply by changing two resistors.
Red: Power Connected (0%) (essentially always on)
Orange: Greater than 35V (25%)
Yellow: Greater than 37V (50%)
Green: Greater than 39V (75%)
Blue: Greater than 41V (100%) (full charge is about 41 to 42V)
Of course, you may select your own colors if desired.
36V Battery Level Indicator Circuit Diagram:
High voltage issues
One limiting factor is the LM339 that has an absolute maximum voltage rating of 36V –and it is not good practice to operate near that point. The solution involves running the IC power rail off a zener shunt regulator. Shunt regulators are very simple, inexpensive and robust –good for this application. However, the LM339 open collector outputs cannot drive LEDs powered from the battery bus due to the same maximum voltage limitation. There are two solutions for this: increase the current rating of the shunt regulator so that it can power the LEDs, or run the LEDs via a cascode amplifier arrangement –I chose the cascode amplifier.
Cascode amplifier
A cascode amplifier is a configuration where one transistor feeds a 2nd transistor that is connected in the common base configuration. This configuration is generally used for RF amplifiers. In this circuit it offers one great property –low voltage in, high voltage out. By tying the bases of these transistors to the 13V bus, the LM339 open collector drive transistors never see more than 13V. However, the cascode transistors may drive LEDs that are tied to a much higher voltage –up to 80V using the MPS-A16. By limiting the emitter current, the LED current is automatically limited to the same value. While this is relatively busy, it places virtually no burden on the shunt regulator.
Circuit Operation
D1 is the voltage reference zener. Tied to this is a string of divider resistors (R2-6) that set the various fixed voltage levels. R7 & 8 form a voltage divider to that divides the battery voltage by a factor of 9. The quad comparator compares the various voltages from the two dividers.
For calibration, connect to a voltage source that can be set to the highest LED threshold (41V in this case). Then adjust the calibration pot until D2 flickers. The remaining LEDs will switch on close to the indicated voltage –accuracy of those voltages may suffer slightly, but should be close.
The LEDs are biased to operate at 2.3mA which is reasonably bright for high efficiency LEDs. This current can be adjusted simply by varying the emitter driver resistors (R9 through R13). To reduce standby power, a push-to-test pushbutton may be used.
Bug
Testing on variable voltage turned up an interesting bug –when the voltage was turned down to about 10V, all LEDs lit again. This was traced to Zener D9 dropping out of conduction thus starving the voltage divider. Connecting a 33K resistor across D9 corrected this little problem without affecting anything else.
Sourced By: w3circuits
Popular Posts

Simple USB Power Booster
April 07, 2018

Simple Steam Whistle
April 07, 2018

USB DC Power Supply from Cigar Lighter Socket
November 01, 2017
Tags
- power supply
- LED Drive
- hobby
- batteries
- charger
- led
- LEDs
- Solar
- Audio and Music
- Inverter
- chargers
- Alarm
- Battery Charger
- sensor
- Alarm and Securty
- Detector
- Lights
- various
- Analogue Design
- indicator
- 555
- Digital
- USB
- VU Meter
- amplifier
- camera
- ic555
- regulator
- Microcontrollers
- Securty
- Video
- automotive
- booster
- components of RS
- connectors
- control
- converter
- garden
- scanner
- switch
- telephone
- wireless
Random Posts
3/random/post-list
Recent Posts
3/recent/post-list


0 Comments